


KosmicKrisp, LunarG’s Vulkan-to-Metal driver for Apple Silicon, has passed the Vulkan Conformance Test Suite (CTS), a rigorous, Khronos-mandated benchmark of API correctness.Thus, KosmisKrisp is now a Khronos Vulkan conformant product for Vulkan 1.3.

Mastering GFXReconstruct: Part 2
The second post in our comprehensive series on GFXReconstruct describes basic setup and usage.

LunarG at XDC 2025: KosmicKrisp Overview
At XDC 2025, LunarG presented an overview of KosmicKrisp. Slides and a link to the video presentation are now available.
Mastering GFXReconstruct: Part 1
Welcome to the first post in our comprehensive series on GFXReconstruct, an open-source tool designed to capture and replay graphics API calls.

A Vulkan on Metal Mesa 3D Graphics Driver
LunarG is thrilled to announce KosmicKrisp, LunarG’s new Vulkan driver for Apple hardware, built within the Mesa 3D graphics framework.
Improving Replay Portability: Initial Support for Buffer Device Address Rebinding in GFXReconstruct
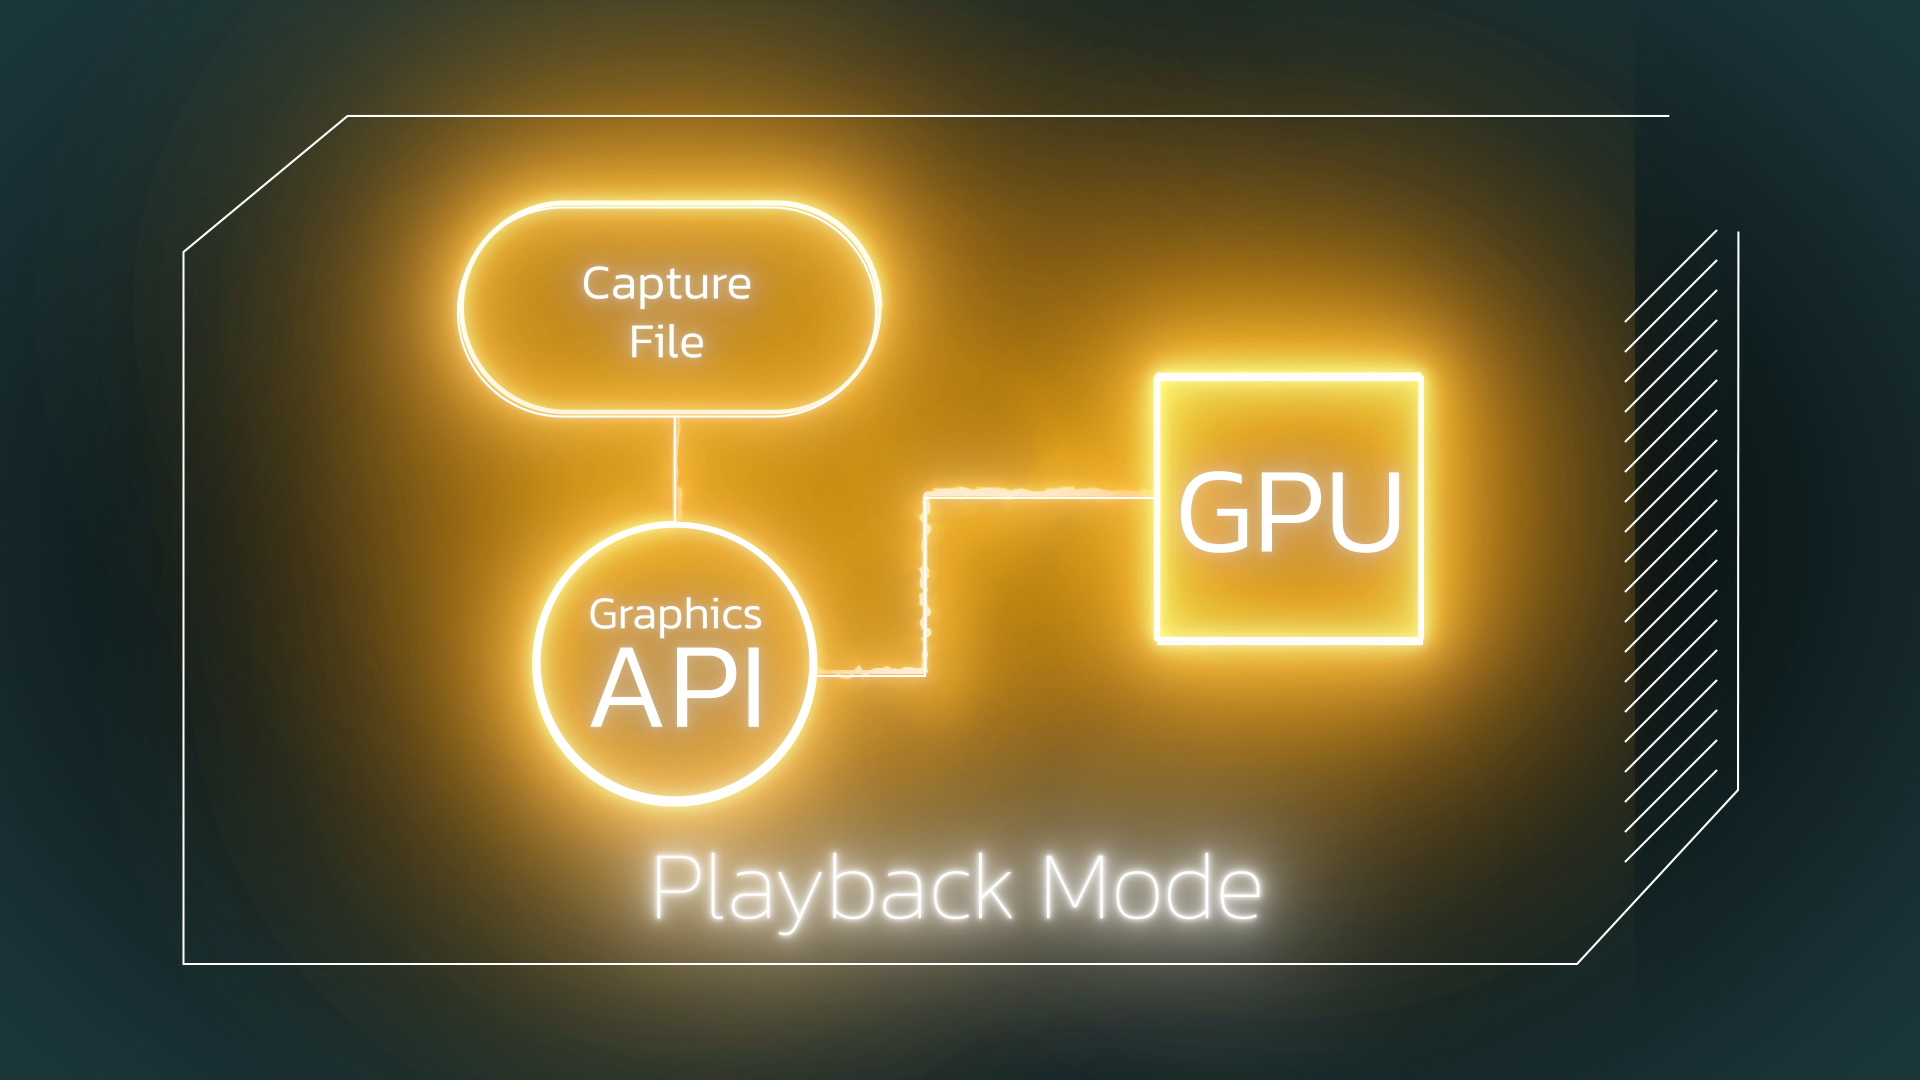
GFXReconstruct now includes initial support for rebinding buffer device addresses at replay time. This post introduces the problem, explains our approach, and shows how to use the new feature with the -m rebind option in gfxrecon-replay.
2025 LunarG Ecosystem Survey Results Released!
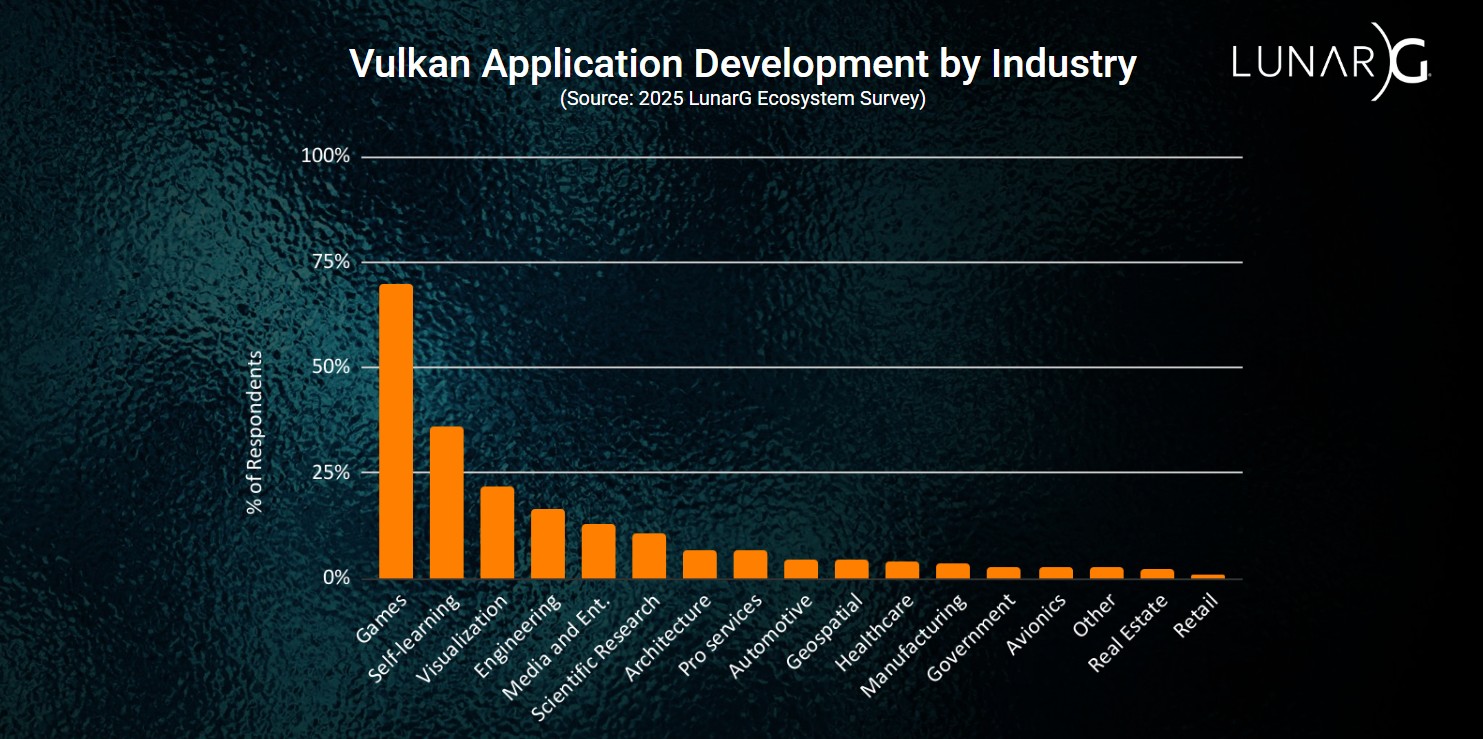
Happy to announce that the 2025 LunarG Ecosystem Survey results are in! Just like we’ve done before, LunarG reached out to the Vulkan dev crowd to see what’s cooking in GPU programming. We got a ton of awesome feedback from developers, studios, industry pros, and hobbyists about their Vulkan adventures, LunarG tools, and the whole scene. First up, a huge shoutout to everyone who took the time to fill out the survey—THANK YOU!!! We run this survey every year to give the GPU dev community a heads-up on the latest trends, sharing the best insights we can. Together with other industry colleagues, we use this feedback to figure out what to tackle in the year ahead. Our goal, as always, is to make Vulkan development easier, faster, and more productive for all Vulkan developers. Just a heads-up, though—this isn’t a fancy professional survey, so the results might not be super scientific. Think of it more like we’re feeling out the vibe, not predicting the weather for every day of the year. Here’s a quick peek at who chimed in: 72% of the folks who responded are regular, advanced, or expert Vulkan developers, while 28% are beginners or basic users. So, we’re hearing from a pretty experienced bunch, with over a third calling themselves expert or advanced. You can access the entire survey here. This blog post contains a few of the results we thought were most significant. Vulkan is used in every industry requiring visualization Vulkan development is everywhere—any industry using a GPU is in on the action! Gaming takes the top spot since it pushes GPUs to the limit with the toughest workloads, making it the biggest player in Vulkan dev by a long shot. Coming in second is self-learning, showing how students, hobbyists, and up-and-coming pros are using Vulkan to level up their GPU programming skills. Visualization (think scientific and medical stuff) grabs third place, engineering (across all kinds) is fourth, and media and entertainment (like digital content creation) rounds out the top five. There’s also smaller but still key usage in industries like research, automotive, aerospace, manufacturing, and government/defense projects. Vulkan is used to deliver cross-platform applications Vulkan apps are running on more than a dozen major OS environments, making the Vulkan API the go-to for native, cross-platform software on modern GPUs. Devs can roll out their apps across ALL the big operating systems with ease! In the survey, Windows 11/x64 took the top spot for Vulkan app deployment targets, followed by Linux/x64 in second, and Windows 10/x64 in third—over half of devs are targeting each of these. macOS came in fourth with about 25% of devs on board, while Android and Steam Deck are also in the mix, each targeted by nearly a quarter of developers. Windows/ARM64, iOS, Nintendo Switch, Steam VR, and Embedded Linux are getting some love too. The huge range of environments devs are hitting with Vulkan just proves it’s the ultimate pick for native cross-platform GPU app development! Windows ARM and Linux ARM ranked as #1 and #2 “important development environments” in the future Windows ARM and Linux ARM are seen as the top two future dev environments to watch! Right now, less than 20% of developers think Windows 11 on ARM64 is a big deal for development, but a whopping 90% say it’ll be important down the road—landing it the #1 spot for the future. Same feeling with Linux on ARM: only about 25% see it as key today, but over 80% believe it’ll matter a lot later, putting it at #2 for future dev priorities. Vulkan API is important now and in the future; WebGPU importance growing No surprise here—Vulkan is a total rockstar for this crew of devs, with nearly 100% saying it’s a key API for development now and in the future. Meanwhile, OpenGL is on the way down, dropping from 40% (important now) to 20% (important in the future), and most of that shift is heading toward WebGPU, which is gaining big time, jumping from 23% to almost 50%! Interest in Slang is growing quickly Though Slang has only been part of the Vulkan SDK since the October 2024 SDK release, it’s already climbed to the #2 spot as the preferred shading language among Vulkan developers. This is a great example of how swiftly LunarG integrates highly anticipated tools into the Vulkan SDK to meet developers’ needs. The majority of Vulkan developers use vkconfig Validation layers are a big deal for catching errors, performance hiccups, and API slip-ups while you’re building your app. Vkconfig makes it super easy for devs to debug their Vulkan apps by handling the enabling, disabling, and customizing of layers. Over half of devs are now using vkconfig to mess with layer settings—that’s almost 3x more than any other method! We totally recommend devs jump on vkconfig during development to build apps that are as portable and solid as possible. Read the whole survey! If these highlights got you curious, there’s a ton more to check out in the full 2025 LunarG Ecosystem Survey! Grab it here.
How to Trim a GFXR File Using GFXReconstruct “Recapture”
If you’re working with graphics debugging or Vulkan application analysis, you’ve likely encountered GFXReconstruct—a powerful open-source tool by LunarG for capturing and replaying graphics API calls. But sometimes, those capture files can balloon in size—especially if you’re recording an entire session when you only need a small slice of it to reproduce a bug or analyze a specific moment. One of the lesser-known but incredibly useful features of GFXReconstruct is the ability to “recapture” during replay, allowing you to trim a lengthy GFXR capture file down to a shorter, more focused version. In this blog post, we’ll go through the process step-by-step. (The discussion here refers to execution on a Windows or Linux or macOS desktop system. Trimming on Android is significantly different and will be the topic of a future tutorial.) What is GFXReconstruct “Recapture”? GFXReconstruct’s “recapture” process involves replaying an existing GFXR file with the capture layer enabled, letting you record a new, trimmed capture file that includes only the frames or sections you care about. This method leverages the replay process to create a new file—perfect for isolating specific moments in a graphics workload without slogging through the entire original capture. Why Trim a GFXR File? Trimming is invaluable when: You’re debugging a bug that occurs in a specific frame range. You want to share a concise capture with a colleague or report a bug without sending gigabytes of data. You need to optimize replay performance by focusing on a smaller subset of frames. Let’s dive into how to do it! Step-by-Step Guide to Trimming a GFXR File with Recapture Prerequisites Before starting, ensure you have: GFXReconstruct installed: You’ll need the tools (gfxrecon-replay, etc.) from the latest Vulkan SDK or built from the GitHub repository. A source GFXR file: This is the original capture you want to trim (e.g., original_capture.gfxr). A working Vulkan environment: Since recapture uses replay, your system must support Vulkan and be able to run the original capture successfully. Python: The gfxrecon-capture-vulkan.py script requires Python 3.5 or higher Step 1: Understand Your Source File First, get a sense of what’s in your original GFXR file. Use the gfxrecon-info tool to inspect it: gfxrecon-info original_capture.gfxr This will output details like the total frame count, helping you decide which frames to trim to. For example, if your bug appears around frame 100 to 150, that’s your target range. Step 2: Capture API calls with a Python Convenience Script The trick to trimming is replaying the original capture while enabling the GFXReconstruct capture layer again. We’ll use gfxrecon-capture-vulkan.py to orchestrate this, as it handles the layer setup nicely. Here’s the command structure: python gfxrecon-capture-vulkan.py -o trimmed_capture.gfxr –capture-frames 100-150 gfxrecon-replay original_capture.gfxr Explanation: -o trimmed_capture.gfxr: Specifies the file name for the new, trimmed capture file. –capture-frames 100-150: Specifies the frame range to recapture (replace with your desired range). gfxrecon-replay original_capture.gfxr: The capture file that is to be replayed and trimmed. (Note: On some systems you may have to specify python3 instead of python.) When you execute this command, here’s what happens: The script launches gfxrecon-replay with the capture layer enabled. The commands in original_capture.gfxr are replayed. As the replay runs, the capture layer monitors the frame count and starts recording at frame 100, stopping after frame 150. The output is written to trimmed_capture.gfxr. You’ll see output indicating the replay process, and possibly a note like [gfxrecon] INFO – Recording graphics API capture to game_capture.gfxr if logging is not explicitly disabled. GFXR will also add the trimming info and a timestamp to a capture file, so in this case it would output “game_capture_frames_100_through_150_{timestamp}.gfxr” where “timestamp” is something like “20250305T111451”. Step 3: Verify the Trimmed File Once the replay finishes, check your new file with gfxrecon-info: gfxrecon-info trimmed_capture.gfxr Confirm the frame count matches your expected range (e.g., 51 frames for 100-150). You can also replay it to ensure it captures the intended section: gfxrecon-replay trimmed_capture.gfxr Tips and Tricks Trim During “Live Capture”: You don’t have to capture instructions into a file. You can “trim” during a live session. The same options and benefits apply, especially in combination with specifying the conditions for capturing data. It is still called “trimming” even though there’s no source file to trim (i.e., we’re “trimming” the commands from the live app). Logging for Debugging: If something goes wrong, set GFXRECON_LOG_LEVEL=debug to get detailed output during recapture. Performance: Recapture requires a live GPU, so ensure your system matches the original capture system’s configuration (same operating system, GPU, and driver version). Ideally recapture should occur soon after capture, on the same system. Hotkey Alternative: Instead of a frame range, you can use –trigger {key}(e.g., use F12 for “{key}”) to manually start/stop capturing during replay by pressing the hotkey. This is less precise but useful for interactive trimming. Optionally provide –trigger-frames to limit triggered frames to a count. Optimize the Result: If your trimmed file still feels bloated, run gfxrecon-optimize trimmed_capture.gfxr optimized_capture.gfxr to remove unused resource data. Why Not a Dedicated Trim Tool? You might wonder why we’re jumping through these hoops instead of using a simple offline trim utility. While GFXReconstruct supports capturing specific frames during initial recording, trimming an existing file currently relies on this recapture method. A dedicated tool has been proposed (see GitHub issue #1109), but for now, recapture gets the job done—albeit with a bit more setup. Wrap-Up Trimming a GFXR file with GFXReconstruct’s recapture feature is a straightforward way to focus on the frames that matter. Whether you’re debugging a glitch, analyzing performance, or sharing a concise repro, this technique saves time and disk space. Give it a try next time you’re drowning in a sea of frames—your future self will thank you! Got questions or run into issues? You can find the user’s guide for GFXReconstruct here. If that’s not sufficient, drop a comment below or hit up the GFXReconstruct community on GitHub. Happy debugging!